Showing posts with label Decor on a Budget. Show all posts

Monday, June 25, 2012

Things Have Been Happening...

Hello again.  I can't believe we haven't posted since before Christmas!  It's not so much that we've let the blog go to the wayside (although we did, I suppose) but... we've also let the house go to the wayside over these past months.  Life has been busy, but we have managed to get a few things done around here.

In January, after being living in this house for about six months, we finally got the rooms configured the way we wanted them.  We had originally thought we would take the front bedroom, so we had moved all of our bedroom furniture in there and moved our TV and futon into the back room to use as a sort of den.  With the living room full of boxes, however, we decided to keep the cats confined to the back part of the house (which is separated by a door), so we started sleeping on the futon so that they wouldn't be alone.  This was supposed to be a temporary arrangement.

Before:


Fast forward to six months later (January), and we're still sleeping on the futon.  So we finally decided, for a few reasons, that the back room was a great bedroom and went ahead and switched the furniture so that we could start sleeping in our bed!

After:


The rooms are still extremely unfinished, so we'll save real life photos for another day.

In February, we (and by we I mean mostly Matt) managed to get half of the kitchen cabinets painted and in working order.  Back in September we had sanded and painted all of the doors and drawers (notice the handy hooks in the sunroom!):


But they had just been sitting there ever since.  Until finally:

 
Check out the awesome shelf liner:


So the bottom is done, but the top cabinets are still on standby.  It will happen one of these days.

Just this weekend we were thrilled to receive a donation of an unwanted couch set for our living room!  Until now, we've been living with this much furniture in our living room:


We've been in this house for over a year and for the first time we can sit and enjoy all rooms of our house.  It's a temporary solution, but we think it looks great for now:


And yes, there are STILL boxes in our living room that have yet to be unpacked.  It's a work in progress.

So there is one other thing that we've been working on around here (which will receive it's very own post, coming very soon).  THE NURSERY!!!  And guess what happens when we don't post for months and months... we only have a few more weeks to finish it up!  We'll keep you posted!


Thursday, September 1, 2011

Bedroom Closet!

We are excited to share our bright new bedroom closets with you!  Before, they were dark, dingy and not very functional.  The closet rod was thick and wooden and you couldn't slide a hanger along it.  The shelves were made of dusty untreated particle board.  We're excited for our bright new colors, new closet rod, new shoe rack (!) and the ability to expand storage space later as we choose!

Here's the closet view BEFORE:


And AFTER!


The inside BEFORE:


And AFTER!


And guess what else?  In the last picture, right under the shoe rack, those are the wood floors that run under all this carpet.  They are painted there but they seem to be in pretty good shape!  What a happy find!

Our closet redo was really pretty simple but it made a huge difference.  First we took everything out and cleaned the whole thing.  We primed and painted all of the paneling but left the upper section of wall and the ceiling as it was (even though the two sides are different colors).  We used a good quality primer because the fake paneling was a glossy texture that paint wouldn't stick to well.  We painted and reused the custom-cut shelves but replaced the brackets and the closet rod.  We installed track for hanging shelves that we can add later but started ourselves off with a shoe rack.  That's all there was to it!


In case you missed this post, the colors we used are Martha Stewart Home's Whetstone Gray and Behr's Summer Breeze (color matched in Martha Stewart Home paint).


Here's the full cost breakdown:

1 gallon Zinsser 1-2-3 Primer:  $19
1 gallon Martha Stewart Home paint in Whetstone Gray:  $29

7 Shelf/Rod Brackets:  $23
2 Expandable closet rods:  $20
Shelves:  Free (reused)
Color Sample of Martha Stewart Home paint in Behr's Summer Breeze:  Free (donated by a friend who couldn't use it)

4 Closet Maid 5' Shelf Tracks:  $41 - after coupon*
Set of 2 Closet Maid Expandable Shoe Racks:  $22

Misc Hardware:  $15

Grand Total:  $169

*Did you know that Home Depot and Lowe's take each other's coupons?  We bought the shelf tracks at Home Depot on a transaction with a $25 off $250 Lowe's coupon that we received when we moved.  $41 is the return value for the tracks after the coupon.  $10 a piece isn't exactly bottom dollar for closet tracks but unfortunately the wide variety of accessories that Closet Maid makes aren't compatible with the budget shelf tracks that HD sells.  That figures.  But compared to some of those pricy closet systems out there, we think we did pretty well for a closet that we love.

Tuesday, August 30, 2011

Bathroom Shelves + A Tiny Tour

Another bathroom post!  Over the next few years our bathroom will be looking forward to a complete overhaul to open up a little more space and return it to something resembling it's original state.  In the meantime, we'll have to live with what we have.  But we can make a change or two while we wait, so here's one that actually made a big difference in the feel of the bathroom. 

When we moved in the bathroom featured this monstrosity of a home-made medicine cabinet right over the toilet:


It was big and bulky and taking up too much physical and visual space, so it had to go.  In some time off during the first weeks we lived here I went ahead and took the mirror down and exposed the open shelving behind it:


That opened the space up a little, but obviously it was not going to cut in for the long run.  Fortunately we just so happened to have a little bit of green paint that matches the ugly green tile almost perfectly.


The paint is Behr's Coriander Seed.  We had some left over from an accent wall in our first apartment in Portland. 


I never really thought of it as being an ugly color, so either it has gotten uglier with age or it's just something about the bathroom.  Anywho, the final product is a vast improvement (I still kind of like the color).


While we're in the bathroom, you might as well have a look around at the rest of it.  There is literally not much to it.


I don't know if you can tell, but the sink is not centered under the medicine cabinet (which is original to the house).  The sink must have been moved at some point.  It's just a bit inconvenient and not so pleasant aesthetically.


And then there's the shower.  It's a built-in tub and surround with a wall on the end and sliding glass doors.  Visually, it takes up a ton of space.  I think the bathroom will seem so much bigger when we can replace it with an free-standing tub and curtain.  And then there's this:


And this:


Aaand this:


Yes, that is indeed wallpaper OVER tile.  But I got curious one day and started pulling:


 And pulling:


The paper just started coming off without any trouble at all.  So now our bathroom looks like this:


I'm kinda digging the faded fish wallpaper for the time being.  Matt says the tile makes him happy when he's in the shower.  It's also kind of fun to see what the bathroom might have looked like at some time.  I guess we're stuck with it regardless; until we dig into the bathroom renovations, at least.

This post has gotten very long for such a small bathroom, but there will be bathroom inspiration photos to come!  If you can't wait you can keep up with our inspiration photos as we come across them on Pinterest:  http://pinterest.com/twoseekhome/our-bathroom 

- Caroline 

Friday, August 26, 2011

Closet Preview + Something Unexpected

We're planning on finishing our bedroom closet this weekend (finally!) and I am so excited to have a closet again that I thought I'd share a little sneak peek!  Here's a reminder of the ugly fake wood paneling that was:


Yep, I went and got into the Picnik photo editor again.  Here is what the closet looks like right now:


And here is the something unexpected.  I was about to paint the shelves the same color that we used in the rest of the closet when I was suddenly struck by a moment of inspiration: why not mix it up a little?  We happen to have just received a few little paint samples of some various shades of greens and blues.  So on a whim, I grabbed one of the samples that had the most paint left in it and got to painting:


So the creamy, dreamy colors of our brand new closet are now:


The first is Martha Stewart's Whetstone Gray and the second is Behr's Southern Breeze but it is actually color matched in Martha Stewart paint.  I love the combination and can't wait to see how it will look when the whole closet is together!

Here is something else that's unexpected:


We got a tip while we were at the Benjamin Moore paint store last week that you can store your paintbrushes and rollers in the refrigerator (wrapped in plastic, of course) if you are continuing to use the same paint instead of washing them between every use.  I was getting sick of washing my rollers, so I decided to get it a try.  As far as I could tell a refrigerated roller worked just as well as a clean one, although I might not try it for extended periods of time or if I was painting something that I wanted to look really perfect.  But, especially if you just need to set your brush down to grab some lunch, it's a great tip!  - Caroline

Thursday, August 4, 2011

Kitchen Colors

As of now our kitchen still looks something like this:


No paint yet.  But we've been thinking about colors so that when we're ready to paint we'll have an idea of what we're going with.  Remember our post on Purple In The Kitchen?  Well sure enough, here's the pallet we're settled on for right now:


What do you think?   Here's the palette from Behr, including a color that approximately matches those (grimy old) counter tiles:


The white, "moon rise" will be the cabinet color, but we're not quite sure about the other colors.  The kitchen is divided into two sections, the main area and a sort of nook area that leads to the basement door.  We were thinking about doing the main section in "delicious berry" and the other area in the "gray timber wolf."  Behr.com has a tool that allows you to upload a picture and paint the walls to get an idea of what different colors would look like.  Here's what we did to the photo at the top of this post:


So what if we switched the colors?  Well, it would look something like this:


Not great images, but it gives you the idea.  So which do you like better?

Thursday, July 14, 2011

How to Recycle Just About Anything

We've started accumulating quite a bit of debris around here from our various cleaning and deconstruction projects.  Currently it is cluttering up our back yard, driveway and garage just waiting to be disposed of.


We'd been planning on renting a dumpster to take care of the mess until today when we started doing some research into how to dispose of the giant sliding door that was overtaking our driveway.


We were doing research on facilities that reuse or recycle building materials and that were willing to pick up large items and were beginning to realize that no one was going to want an old aluminum screen door for their rebuilding project (most places that accept things like doors or windows only accept vinyl).  One facility suggested that we contact a local rebuilding center that might at least take the door and recycle it for us.  Just minutes later, a gentleman rang our doorbell and asked if we would like him to recycle the metal from the door for us.  He is probably going to make a buck or two off us, but we were just happy to get rid of the thing without throwing it in a dumpster!  He offered to take the glass, as well as the glass we had stacked in our yard from the porch deconstruction for a fee, but we declined.  There must be a way that we can do these sort of things ourselves without a timely stranger driving by and offering to dismantle our large debris and hauling it away for us.  With a little more research we began to discovered that we can recycle well... pretty much everything.  So much for that dumpster.  So we wanted to share some tips and steps to recycling everything based on our research and experience:

1.  Deconstruction vs. Demolition:  Our last post was incorrectly named.  What we did to our porch over the weekend was not demolition, it was deconstruction (for the most part).  Deconstruction is when a structure is carefully dismantled in order to maximize the materials that can be reused or recycled.

2.  Get creative about reuse:  Construction materials can be costly if you have to go out and buy them for a future project.  Think about what you can reuse or re-purpose and ask friends and family for suggestions.  For example, Matt's cousin suggested that we or somebody else might want to use wood and glass to construct a cold box for winter growing in our garden as in this post from the door garden.


There are also all sorts of resources online for updating and re-purposing old furniture.  Check out blogs such as centsationalgirl.com for loads of inspiration.

3.  If you can't use it, see if someone else can:  Ask friends, family and neighbors if they have a need for building materials, furniture and other goods you're looking to discard.  One of our neighbors laid claim to our plexiglass, scrap wood and cinder blocks just days into our deconstruction projects.  You can also post items for sale or for free on websites like Craigslist.org and Freecycle.org.

4.  Look into building material donation sites:  Habitat for humanity takes donations of new and gently used building materials, appliances, tools, office supplies and more for their building projects to be sold in their not-for-profit store.  Donations need to be in saleable condition and free of nails, dirt, mold, rot or lead paint.  Go to www.habitat.org/getinv/materials_donations.aspx to find a Habitat ReStore near you and check for individual requirements for donated goods and materials.

5. Check your local recycling rules:  You may be able to recycle things right on your sidewalk that you never would have expected.  For example, Portland recycling will take any scrap metal as long as it fits in your recycling bin.

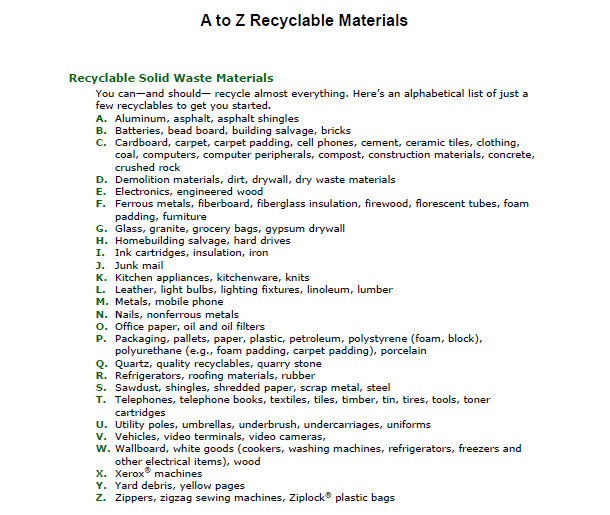
6. When all else fails, do some research:  We were amazed at this A to Z list of recyclable goods compiled by a local recycler (click to view larger):


It is really eye-opening to see all the things that can be recycled if you can find the right facility.  It is possible that you will have to pay a small fee to bring your goods to a recycling facility, but in many cases they will take small loads brought in by individuals (as opposed to corporate recycling) for free and some will even pay for certain materials.  You may have to do a little research, but there could be many facilities in your area who will take some or all of your recyclable materials.  When doing your research be sure to watch for referrals; many recycling centers really care about what they are doing and if there are items that they can not take they may refer you to someone who can.  If you are doing a remodel or demolition project you can also research deconstruction and recycling services in your area.  These types of services will actually come to your site and complete your project in a way that maximizes what can be recycled and reused and take it all away with them.

For you Portlanders reading, here are a few of the services we came across in the metro area:

http://rebuildingcenter.org/

http://www.pdxrestore.org/donors_individual.html

http://www.ecrrecycling.com/index.htm

http://www.oregonmetro.gov/index.cfm/go/by.web/id=525

http://library.oregonmetro.gov/files/construction_salvage_recycling_toolkit_2010.pdf

Happy Recycling!

Thursday, July 7, 2011

Washer and Dryer Platform on the Cheap


Last week we finished up our washer and dryer platform project and over the weekend the new machines were delivered!  We made a few mistakes and learned a few things but overall the project turned out pretty well.

When we started out it would have been all but impossible to put a washer and dryer in the area where the hookups were.  The previous owners had poured a concrete platform for a dryer, but it was far too small for our large new dryer.  The washer had apparently been balanced on two pieces of wood over an old sunken floor drain.  Since we were having the sewer replaced anyway, which involved digging up the basement floor to lay new pipe, we paid a little bit extra and and had the floor drain moved to the center of the room.  The project, however, still left a substantial dip in the floor where the old drain had been and our new washer needed to go and of course there was still that small platform where the dryer needed to go.


We considered a few possible options.  We could have poured a full concrete platform for our new washer and dryer to sit or we could have built a wooden platform over the whole area, but we ended up deciding on a combination of the two.  We are planning on finishing the basement eventually, so we didn't want something as permanent as a concrete platform and we weren't sure that we had the tools or skills to build a level wooden platform on such an un-level surface.  Since the entire basement will eventually have to be leveled anyway, we decided to level out washer and dryer area with concrete and build a simple and inexpensive platform over the existing concrete platform.

We started out with a bag of concrete that the sewer contractors left behind to fill in the deepest part of the dip in the floor (check out a little more on this part of the project here).  We cleaned the whole area thoroughly and brushed away any crumbling concrete from around the old platform with wire brushes.  The floors are painted so we used a paint scraper to scrape away as much of the paint as we could.  We coated the whole area with bonding concrete primer per the instructions on the bottle using a long handled paint roller.  We mixed the concrete per the instructions on the bag, poured it into the deepest area and leveled it out as best we could using a garden rake, mason trowel and wood float.


One 80 lb bag of concrete doesn't cover much ground when you're trying to fill in an area that is at least two inches lower than the rest of the floor.  To increase the area that is level we used a multi-purpose concrete that can be mixed to be pourable and self-leveling.  We just cleaned and primed the whole area again and poured the concrete right down.  It flowed out to fill the area and leveled itself perfectly with almost no work on our part.  The only challenge at this step was that we chose a quick-setting concrete which we found very difficult to work with.  Working quickly tends to be something that comes with experience and we found that the concrete was beginning to set in the buckets while we were still trying to figure out if we had reached the right consistency.


Once we had a level surface to work with, the rest was easy.  We opted to spend a little extra on a pre-treated piece of 3/4" plywood so that we wouldn't have to worry about warping or water damage.  The kind folks at Home Depot were nice enough to cut the board to the right size for us.  Because our project is temporary, however, we decided not to spend a lot of money on the construction of the platform.  We used the existing concrete platform as part of the support for the new platform and just used inexpensive wood shims to support the rest of the platform.  We drilled a couple wood screws into the shims to keep the whole thing together and it looks like it will last us a little while.


Now that the project is complete, there are a couple weaknesses that we've identified:

The shims are not very sturdy and most of them cracked when we drilled screws through them (despite the fact that we drilled pilot holes first).  They definitely will not be a long term solution, but seem to be holding up fine for now. 

After the washer and dryer were delivered, we noticed that the new concrete had cracked in a few places.  We think that this is probably due to adding too much water when we were mixing it.  Based on this experience, unless we gain some more concrete knowledge along the way, we will probably bring in professionals when it is time to level the whole basement floor.  Fortunately our washer and dryer are designed to minimize vibrations so both the shims and the concrete should be okay for now.

Overall we think we achieved a pretty good balance of functionality and cost effectiveness.  Here is the final cost breakdown of the whole project (not including the washer and dryer):


Wire Brushes:  $12
Paint Scraper:  Purchased for other projects
Bonding Concrete Primer:  $15
Paint Roller:  Purchased for other projects
Paint Roller Cover:  $5
80 lb bag concrete:  Free (left by sewer contractors)
50 lb bag multi-use concrete:  $19
Concrete Mixer Drill Attachement:  $13
Buckets, Mason Trowel & Wood Float:  $22
Shovel:  Free (left at house by previous owners)
Garden Rake:  Purchased for other projects
Total cost to level the floor:   $86

Treated 3/4" Plyboard:  $46
6 sets of shims:  $9
Wood Screws:  $3
Total cost of Platform:  $58

Grand Total for our Washer and Dryer Platform Project:  $144
Related Posts Plugin for WordPress, Blogger...